
Maintaining a yacht in good condition when it is docked pays off. However, every boat owner knows that issues are just around the corner and that maintaining shore power connections is a no-brainer requirement.
Skippers won’t need to worry about it themselves if they take care of the shore power connections. For instance, turn off the power before attaching or removing cables. It’s not as challenging as it appears, according to specialists aware of customers’ difficulties with using marine shore power.
If you are wondering why your shower power is suddenly not working, than this guide will help you to get power flowing by fixing the breakers for the feeds into the boat, shore cord, or Y adaptor.
Be careful anytime you are working with electronics to avoid accidental electrocution. If unsure, call the professionals to help troubleshoot your issue with connecting to shore power.
Guide for How To Check and Troubleshoot Shore Power System Problems
 If you are onboard your boat and the outlets and other electrical systems onboard are no longer operational you may have an issue with your shore power system. Read more for helpful tips.
If the shore power system is turned off for a prolonged period of time you risk completely discharging your battery systems onboard as well as food in the fridge getting ruined and pumps and other systems no longer operating.
First Items to Check for Shore Power Failure:
- First we start at the shore power pedestal or box on your dock. Look where your cable plugs in, check the plug is completely seated in the outlet, then identify the breaker and completely turn this breaker off and on. (if you have an AC non contact meter it helps ensure there is power at this point).
- Then follow the cable up to where it attaches into your boat, check the wire to ensure no damage. Where the cable plugs into the boat, look around and find a breaker either on the exterior or interior of the boat where this plug goes (This is a secondary safety to ensure fires don’t happen onboard from failure.) Traditionally there is always one breaker on this inlet well before power gets to your main power panel. Also use a non contact meter to ensure power is still flowing here.
- Once the breaker is found, reset it and move along to the main panel. Here once the main breaker is on you should have a power meter to help see if any power is coming onboard. If this system is now working you are good, if not you can again use the non contact meter to check the breakers for power. If you are not getting power here then checking behind the panel or looking in your engine room for another hidden breaker would be the next best step.
- If you are still unable to get power after these steps it is recommended to call your electrician and get someone out as soon as possible to ensure your boat power is restored and your batteries and other systems don’t get damaged.
🔋 Pro Tip: Turn off high-power appliances (like A/C units) before plugging into shore power. This prevents overloading the system during connection.
Issue Check – Step by Step for Boat Shore Power Not working
The following are some of the things that should be on your checklist when it comes to a shore power issue inspection to diagnose and repair your boat’s connection.
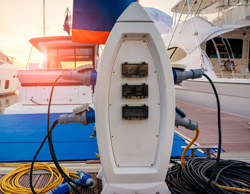
1. Inspect the Shore Power Pedestal
The shore power pedestal or box on your dock is where we begin. Check that the plug is well inserted in the outlet where your cable plugs in, then locate the breaker and turn it on and off. Also, using an AC non-contact meter to check whether there is power here is helpful.
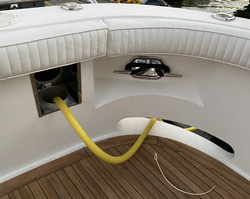
2. Check the Cables
After that, follow the cable to the point where it connects to your boat and inspect the wire for any damage. Look around and locate a breaker on the exterior or inside of the boat where the cable connects. A breaker is often present on this input at all times, long before power reaches your main power panel.
3. Now Call a Professional
It is advised to call an electrician if you are still unable to receive power after trying these methods to have your boat’s electricity restored and prevent damage to your batteries and other equipment.
4. Avoiding ELCI Problems
By sensing minute amperage variations between the “hot” black and “neutral” white wire in your boat’s AC service, ELCI and RCD devices safeguard against electrical leakage. A risky condition that results in Electrical Shock Syndrome drownings when individuals enter the water near a leak and become stronger electrical conductors than the surrounding water is when electricity spills from a boat’s AC wiring into the surrounding water.
Freshwater has a greater risk for electrical shock drownings syndrome, while it can also happen in brackish or saline water.
5. Reset the Breaker
Reset the breaker after it has been located, then go to the main panel. Once the main breaker is turned on, you should have a power meter to determine whether any electricity is entering the vessel. If the system is now operational, you are ready to go; otherwise, you may check the breakers for power once more using the non-contact meter. Check under the panel or in your engine room for another concealed breaker if you are not getting power here.
6. What About the Temperature?
Check the temperature of the cables frequently since a warm cord might be the first indication of a potential corrosion issue. If everything is in order, the chord should be within two degrees of the surrounding air’s temperature. The moment it rises over that point—say, let’s 10 degrees above ambient temperature—indicates a problem. Some individuals utilize infrared thermometers to measure the temperature of their shore power hookups.
🔌 Pro Tip: Keep a spare shore power cord onboard. Even if your current one looks fine, a backup can save you in a pinch.
Be Careful and Always Check Shore Power Connections
 It just takes a few seconds to check the condition of your boat’s shore power connections, but it can avoid an electrical failure that could be a little nuisance or, worse, a fire that could severely harm people and property. Make sure the cable is not broken if it is stretched or pressured for any reason.
Searching for a professional marine electrician? We’ve got you covered.
Contact Zisser Marine Service and we’ll be ready to examine an issue with your boat and address it!
When plugged into an electric meter the shore power trips both the outside meter,ie the source and the boats trip switch,when it is plugged into the generator it works perfect, any ideas would be much appreciated 👍
No power at the inboard end of the shoreline. Is there a concealed isolator on Fornula 45 between the main AC panel and shore power
There is a breaker normally near the shoreline Input. Otherwise I’d expect a shore power converter somewhere in the lazaret or engine room.