

A windlass, often overlooked but undeniably crucial, is the unsung hero of a boat’s anchoring system.
 This robust mechanical device bears the responsibility of effortlessly raising and lowering the anchor, ensuring the vessel’s stability and safety.
Just like any other vital component, the windlass demands regular maintenance to guarantee its reliable performance.
Steps to Troubleshoot Windlass Not Working
In this comprehensive guide, we’ll delve into the intricacies of windlass care and offer step-by-step instructions on how to fix it should you encounter issues.
Step 1: Ensure Safety First
Before embarking on any repair journey, prioritize safety. Confirm that the power to the windlass is completely switched off to prevent any accidental activations that could lead to mishaps during the maintenance process.
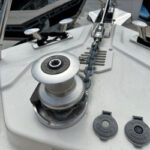
Step 2: A Thorough Windlass Inspection
Begin your repair mission by carefully inspecting the windlass to pinpoint the source of the problem. Keep a keen eye out for any telltale signs of wear and tear. Examine the motor and gears, as these are often culprits for malfunction. Take note of any rust or corrosion, as these can significantly impair the windlass’s functionality.
Step 3: Powering Up the Unit
To assess the power supply to your windlass, follow these more technical steps:
- Check Electrical Connections: Examine all electrical connections and cables leading to the windlass. Ensure they are securely fastened, free from any damage, and devoid of corrosion. Loose or corroded connections can cause voltage drops, leading to insufficient power delivery to the windlass.
- Voltage Test: Using a multimeter, measure the voltage at the windlass terminals while the power is turned on. Ideally, the voltage should match the boat’s battery voltage. A significant drop in voltage might indicate wiring issues or a malfunctioning power supply.
- Amperage Draw: Perform an amperage draw test to gauge the power consumption of the windlass during operation. Connect an ammeter in series with the windlass power supply. This will help identify if the windlass is drawing more current than it should, which could be a sign of motor or mechanical problems.
Step 4: Cleansing Ritual
 A good cleansing is in order. Use a damp cloth to gently wipe away accumulated dirt, grime, and salt deposits that may have taken refuge on your windlass. Exercise caution and opt for non-abrasive cleaners to avoid inadvertently harming any sensitive parts.
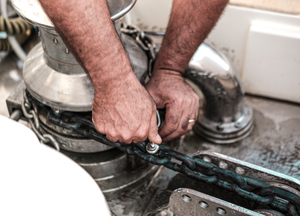
Step 5: Lubrication – the Elixir of Functionality
Apply a generous coat of lubricant to the windlass to ensure its smooth operation. Pay extra attention to the components that are constantly in motion, such as the gears and the chain.
Adequate lubrication not only enhances performance but also prolongs the lifespan of your windlass.
Step 6: Motor Matters
If the motor has succumbed to wear and tear and is the root of the problem, it might be time for a replacement. Consult your manufacturer’s manual for precise instructions on how to swap out the motor. Ensure that you procure the correct motor model specifically designed for your windlass.
Step 7: The Gear Dilemma
Worn-out gears are another common source of windlass troubles. If your inspection reveals this as the issue, consult your manufacturer’s manual for guidance on gear replacement. As with the motor, be meticulous in selecting the correct gears tailored to your windlass.
Step 8: Testing Your Windlass (The Proof of the Pudding)
With the repairs completed, it’s time to put your windlass to the test. Re-engage the power supply and meticulously observe the windlass in action. Lower and raise the anchor several times to ensure it operates smoothly and without any hiccups. This step is crucial to validate that your repairs were successful and that your windlass is back in peak form.
Fix or Troubleshoot Windlass Issues Conclusion
In conclusion, the process of fixing a windlass can be a relatively straightforward endeavor if you follow these meticulous steps.
Always prioritize safety, adhering to the golden rule of turning off power before you commence. Consult your manufacturer’s manual as your trusted guide, and make sure to invest in the appropriate replacement parts. With patience, technical knowledge, and an eye for detail, you can guarantee that your windlass remains in optimal working condition, bolstering your confidence in safely anchoring your vessel whenever the need arises.